
Version 2 is out now: Last Lap Socks 2.0
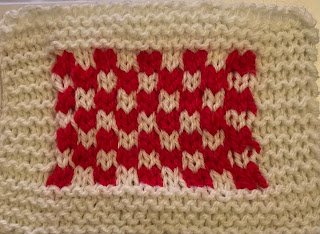
Both samples were made from recycled material. My local charity shop was about to throw out some old crochet garments. I bought any I thought I could harvest yarn from. All acrylic. They got a good scour in soapy hot water, and then came the unravelling process. Most was salvageable. That's why I find it hard to recommend a particular yarn to copy the first sample. Sample 2 (the swatch) was knit in Scheepjies Scrumptious, which is 50% recycled bottles, and James C Brett Second Chance, which is made of entirely recycled fibre.
Second hand is always going to be best for the planet. Keeping even this small amount of plastic out of landfill feel important (even if billionaires are taking private jets don't get me started). There are a number of low impact wool options out there too. Generally I would say look for locally farmed sheep and check the dye used isn't poisoning the water.
Gauge: 21-23 sts in 4 inches in Chart 1 when blocked. The variation in gauge will determine the circumference of the sock. If you have narrow feet, aim for 23 sts. If you have larger feet, aim for 21sts. You may struggle to get gauge if your floats are too tight - this will also make it hard to fit the sock over your ankle so it's very important to make sure the swatch has enough stretch.
You will need:
Approx 50g of DK yarn (30g MC, 20g CC)
3.25mm DPNs / short circulars (or magic loop)
Tapestry needle
Techniques:
Colourwork - This is done by carrying floats (fair isle). Make sure the floats are not too tight. It will warp the design and make the sock difficult to put on.
Jogless stripes - Knitting in the round is a spiral so the design is out of sync at the beginning of the round. There are a couple of ways to fix. I recommend trying them out and seeing what works for you: Option 1 Option 2. (It is not necessary to do this as the jog is hidden at the bottom of the foot for the most part.)
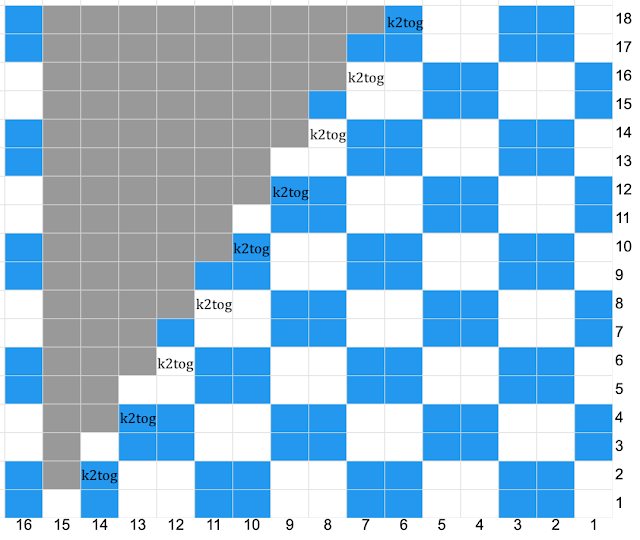
Reading charts - info on the charts can be found at the bottom of the pattern
Abbreviations:
MC - main colour (in the sample it's blue)
CC - contrast colour (in the sample it's white)
R - round/row
st(s) - stitch(es)
k - knit
p - purl
s - slip purlwise
ssk - slip slip knit
k2tog - knit 2 together
p2tog - purl 2 together
pm - place stitch marker
sm - slip stitch marker
*Pattern starts here*
In MC cast on 60 sts, join in the round, and work 8 rounds of 2x2 rib.
Knit one round.
Complete 16 rows in pattern (Chart 1). Break CC yarn.
Heel: (in MC)
R1: [sl1, k1] 15 times (30 sts)
R2: [sl, p1] 15 times (30 sts)
Repeat R1&R2 14 more times
Turn: (in MC)
R1: s1, k15, ssk, k1, turn
R2: s1, p3, p2tog, p1, turn
R3: s1, k to one sts before gap in sts, ssk, k1, turn
R4: s1, p to one sts before gap in sts, p2tog, p1, turn
Repeat R3 & R4 until 16 sts remain (Ending on wrong side row)
Knit across the 8 sts. Place stm. This marks the start of the round.
Gusset: (in pattern = Chart 1)
In pattern, k8 starting from the second white stitch (column 4 of Chart 1). This is extremely important otherwise the charts won't line up!
Pick up 16 sts up the side of the heel flap (this is the first row of Chart 2).
Knit across the top of the foot in pattern, starting with column 3 of Chart 1.
Pick up 16 sts down the side of the heel flap (this is the first row of Chart 3).
Knit the final 8 sts on the round following Chart 1, starting with column 4.
Continue to work foot following charts.
Once Charts 2 & 3 are complete, keep working in pattern for 7 repeats of Chart 1 or until 1 1/2 inches before desired length.
Toe:
R1: k15, pm, k30, pm, k15 (60sts)
R2: [knit to 3 sts before marker, k2tog, k1, sm, k1, ssk] repeat twice, knit to end (4 sts decrease)
R3: knit all stitches
Repeat R2 & R3 until 40 stitches remain.
Repeat R2 until 20 stitches remain.
Knit 5 stitches then Kitchener the sock closed. Weave in ends.
Repeat all over again for the second sock!
Charts:


Knit MC

Knit CC
Chart 1:

Chart 2:

*Pattern ends here*
If you make this pattern tag me on Instagram @frednamakes and use the hashtag #LastLapSocks
🧡✌